
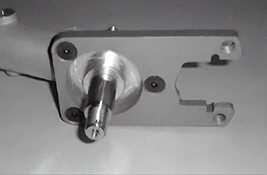
Fit caliper mounting plate to swing arm as shown, tighten cap screws to 12 lb/ft. The mountings are not left and right handed. Refit the cable bracket from the drum brake set up as this will be required as a mounting for the return spring for the caliper handbrake lever.
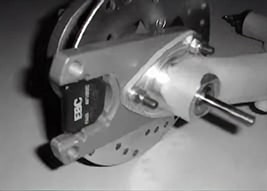
The inner brake pad fits into the recess in the caliper mounting
The outer pad is fitted as the caliper is mounted. The calipers are left- and right-handed, and should be fitted with the bleed screw upwards. Before the caliper can be mounted, the handbrake cable must be fitted to the caliper lever arm with the clevis pins supplied (pin must be fitted pointing down, as it will foul the slide pins). Cable extenders are supplied because in reality all Minis have differing cable set ups and the extenders maybe needed to establish the correct relationship between the cable length and the lever arm, The caliper slide pins and slide pin holes should be well greased and pushed through the caliper until the thread touches the mounting then carefully screw the slide pins into the mounting and at the same time allow the ends of the pins to engage in the square holes in outer pad. The slide pins should be tightened to 10 lb/ft.
Adjustment for Use
Adjustment procedure should be as follows:
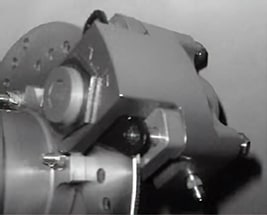
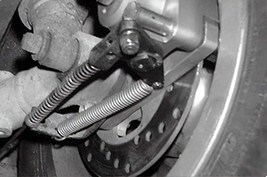
Slacken the handbrake cable in the car at the handbrake lever. Screw out the adjuster screw until it is clear of the outer brake pad. Turn the caliper handbrake lever towards the front of the car to squeeze the pads onto the disc. The caliper handbrake lever will rotate to sit at about 65° to the disc surface (see photo)
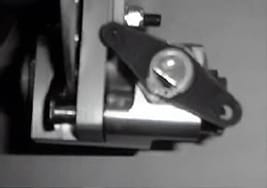
Wind in the adjuster screw in by one full turn (the caliper hand brake lever will rotate towards the back of the car) then undo the adjuster nut by half a turn. In this position, the lever will work at the most effective angle and with the adjuster backed off by the half turn, the pads will have running clearance on the disc.
The handbrake cable can now be adjusted in the car at the handbrake lever. If the cable length is insufficient, cable extenders are supplied which add one inch to the cable length. Be careful not to tighten the handbrake cable too much otherwise the running clearance will disappear. The return spring must then be fitted from the other end of the caliper handbrake lever, running forward to mount on to the cable bracket as shown, a 3mm hole should be drilled into the cable bracket to anchor the forward end of the spring.
The hydraulic operation of the caliper (footbrake) is self adjusting for brake pad wear. The handbrake element (mechanical operation) must be manually adjusted via the adjuster screw, and this will be indicated by a progressively longer handbrake lever.
Operation and Care
It would be a sensible precaution to park the vehicle in gear if leaving the vehicle after a period of heavy brake use where the discs and calipers will have expanded with heat as subsequent cooling and contraction could lead to a loss of handbrake grip. This will at least mean the car will remain where you parked it particularly on inclined surfaces. Please note that the handbrake mechanism will be damaged if abused: so handbrake turns should not be attempted, similarly in applications where excessive heat is generated by either left foot braking or where heavy rear basis used, disc warping may be experienced. This is a lightweight race style conversion and should be treated with some degree of respect. The moving parts should be lubricated with grease to ensure smooth operation, especially the sliding pins.
Since many of the parts are aluminium, road salt will ruin the finish if allowed to accumulate, so periodic cleaning and a wipe over of WD40 or similar corrosion inhibitor (not on the discs or pads) will help to maintain the finish and ensure trouble free operation. Sliding calipers usually only give trouble if not maintained. These are now your calipers and it is your responsibility to look after them.
Questions or comments about this page? Please don't hesitate to contact our Classic Mini experts!